Welcome to LaunchQuik Documentation
LaunchQuik is a complete Shopify Remix app boilerplate & toolkit with everything you need to launch your shopify app faster than ever. It allow developers to focus solving merchant problems, instead of boring and repetitive tasks.
What you will get?
- Billing & Subscriptions: Works with both managed and manual pricing. Monthly & annual subscription plans, usage charges, one-time charge, all integrated in the code.
- Webhooks integration: Effortlessly create and manage real-time webhook events.
- Emails integration: Supports Resend, Mailgun and Brevo. Send Emails on install and uninstall along with separate admin page for sending app updates to all Merchants.
- Embedded app with Polaris: Ready to use embedded app with Polaris components.
- Ready-to-use Extensions: Jump-start your development with ready-to-use theme app blocks, checkout UI extensions, post-purchase extensions, app embed blocks, and many more coming in future updates. Don't forget to say bye to "CORS errors".
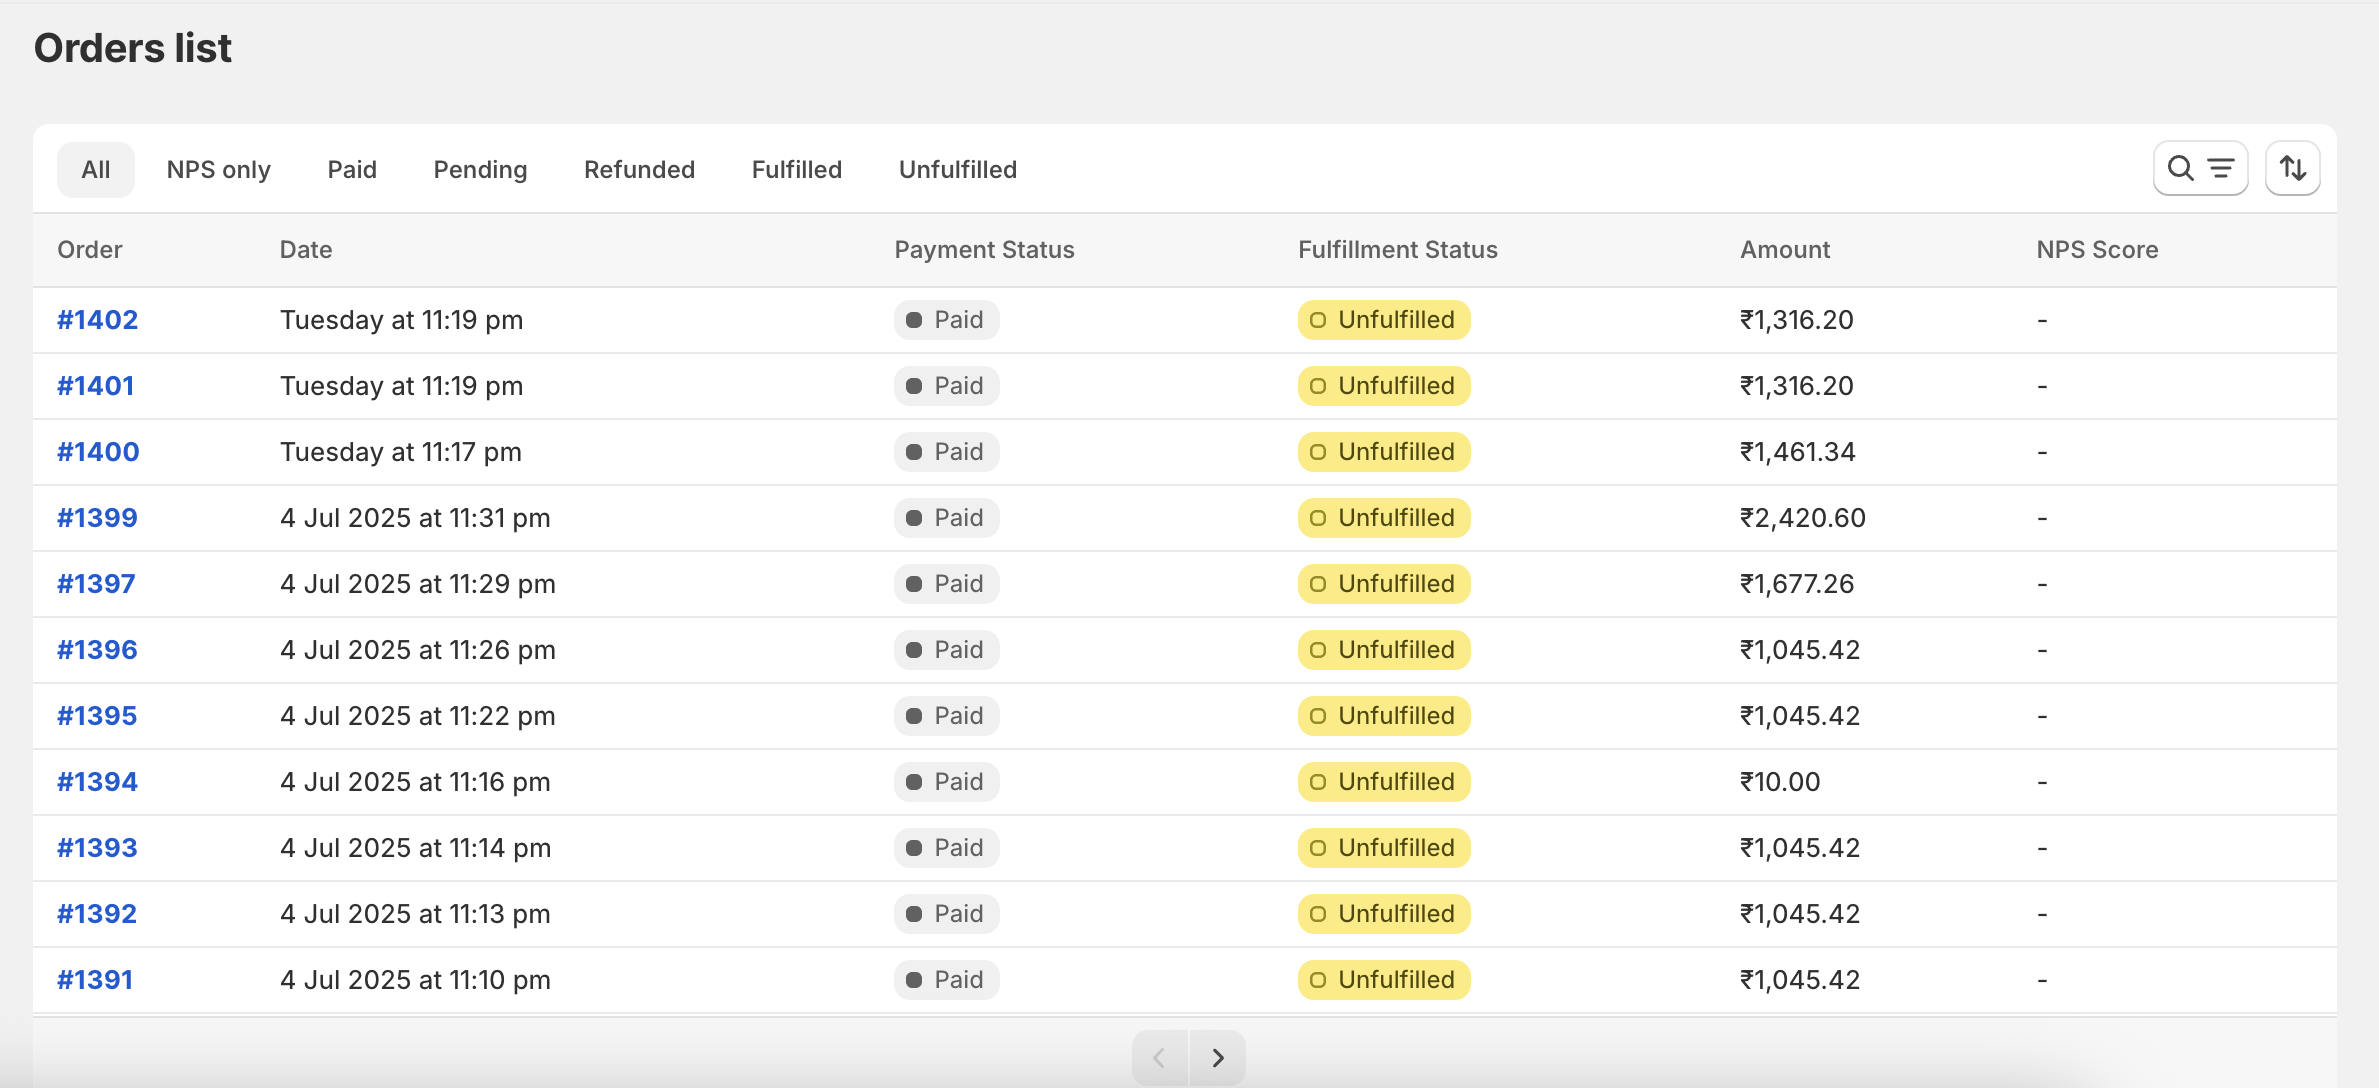
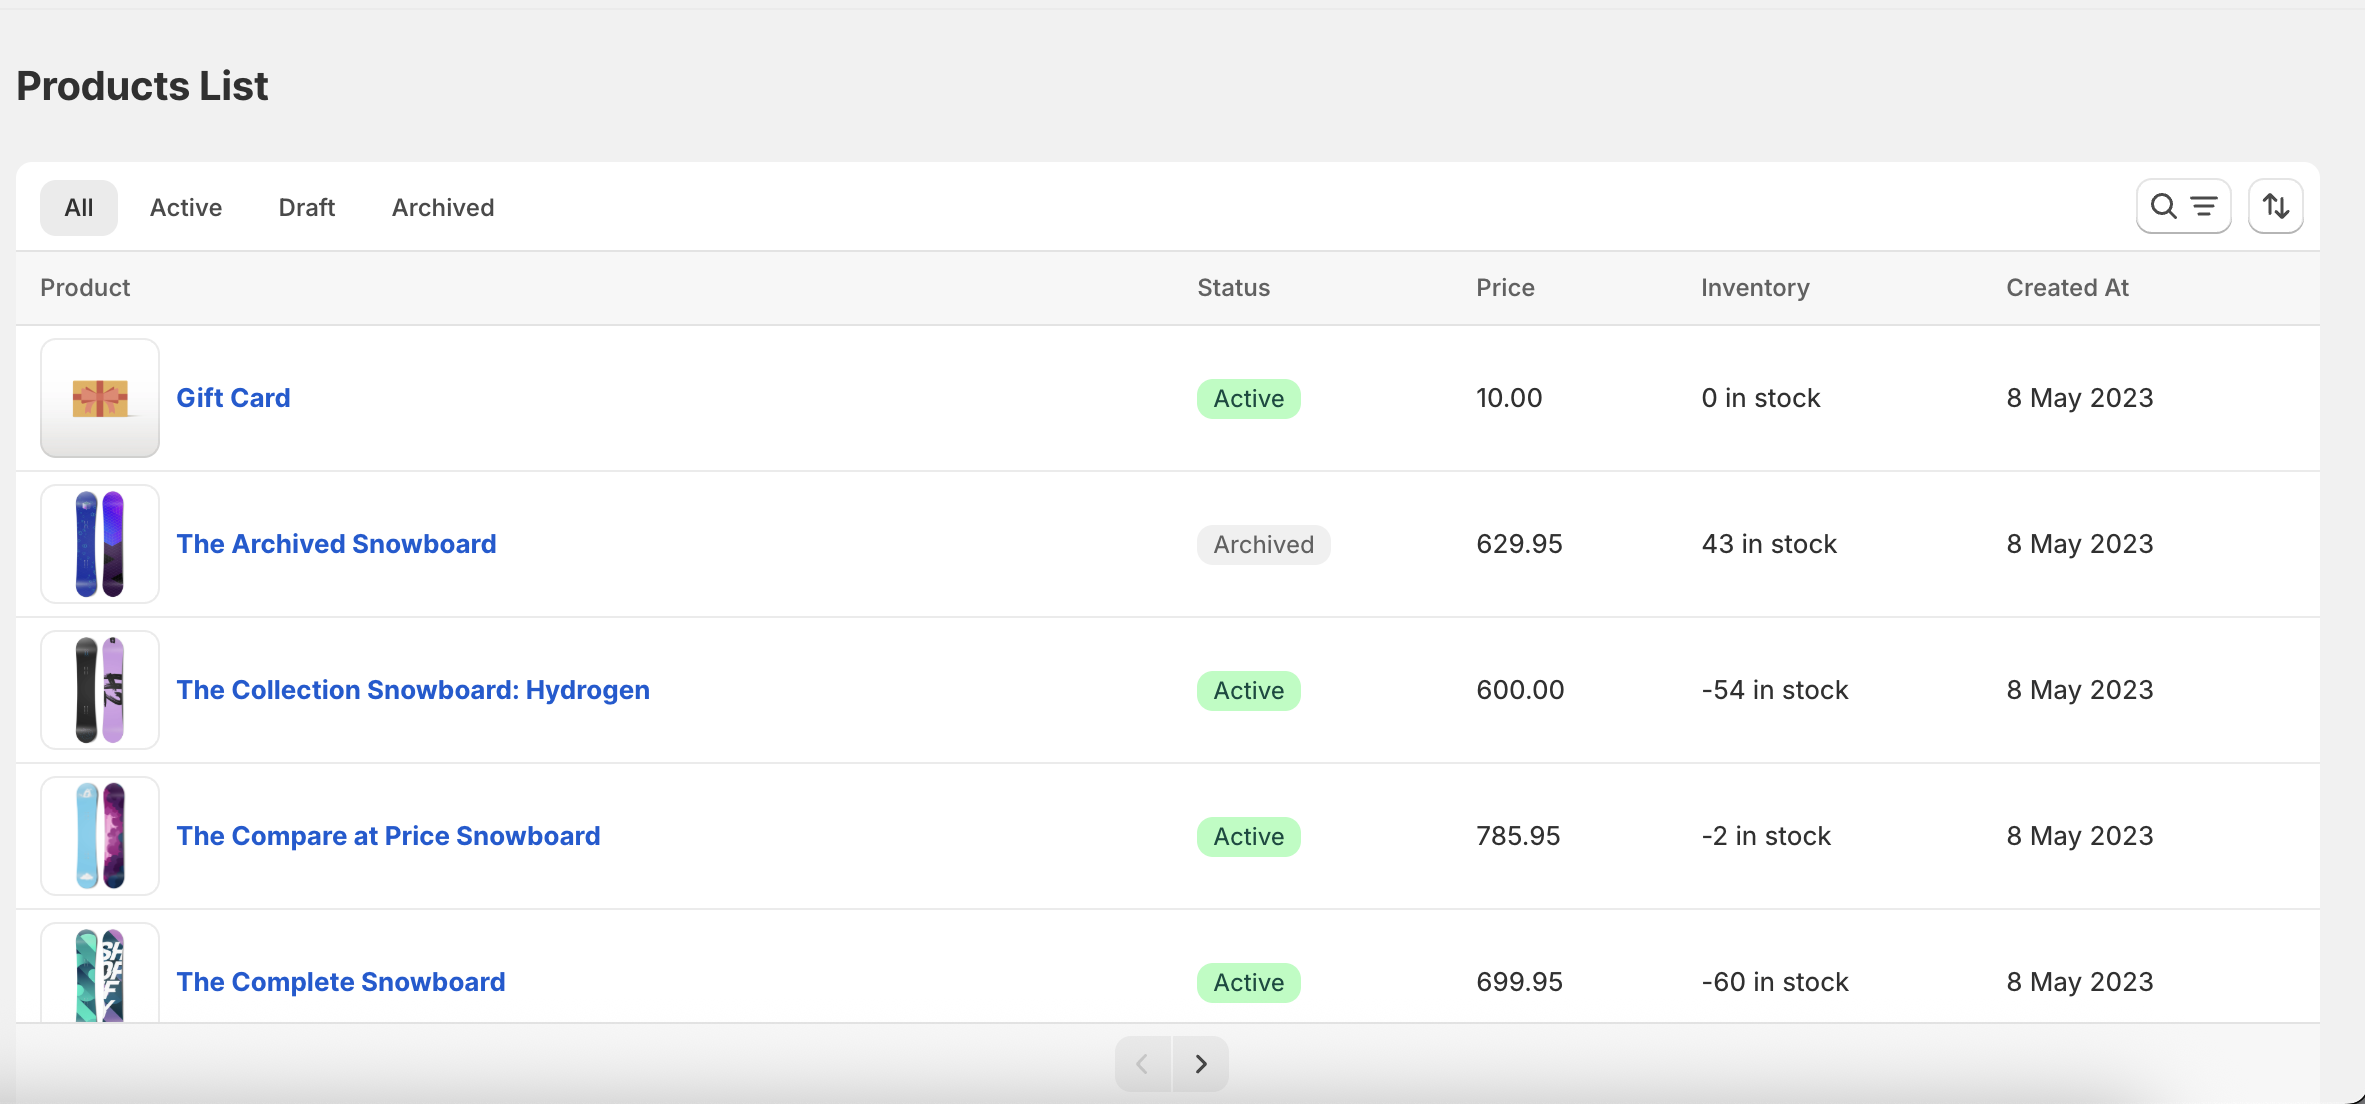
- Pagination tables: Built-in pagination tables for orders and products along with search, sort and filter options.
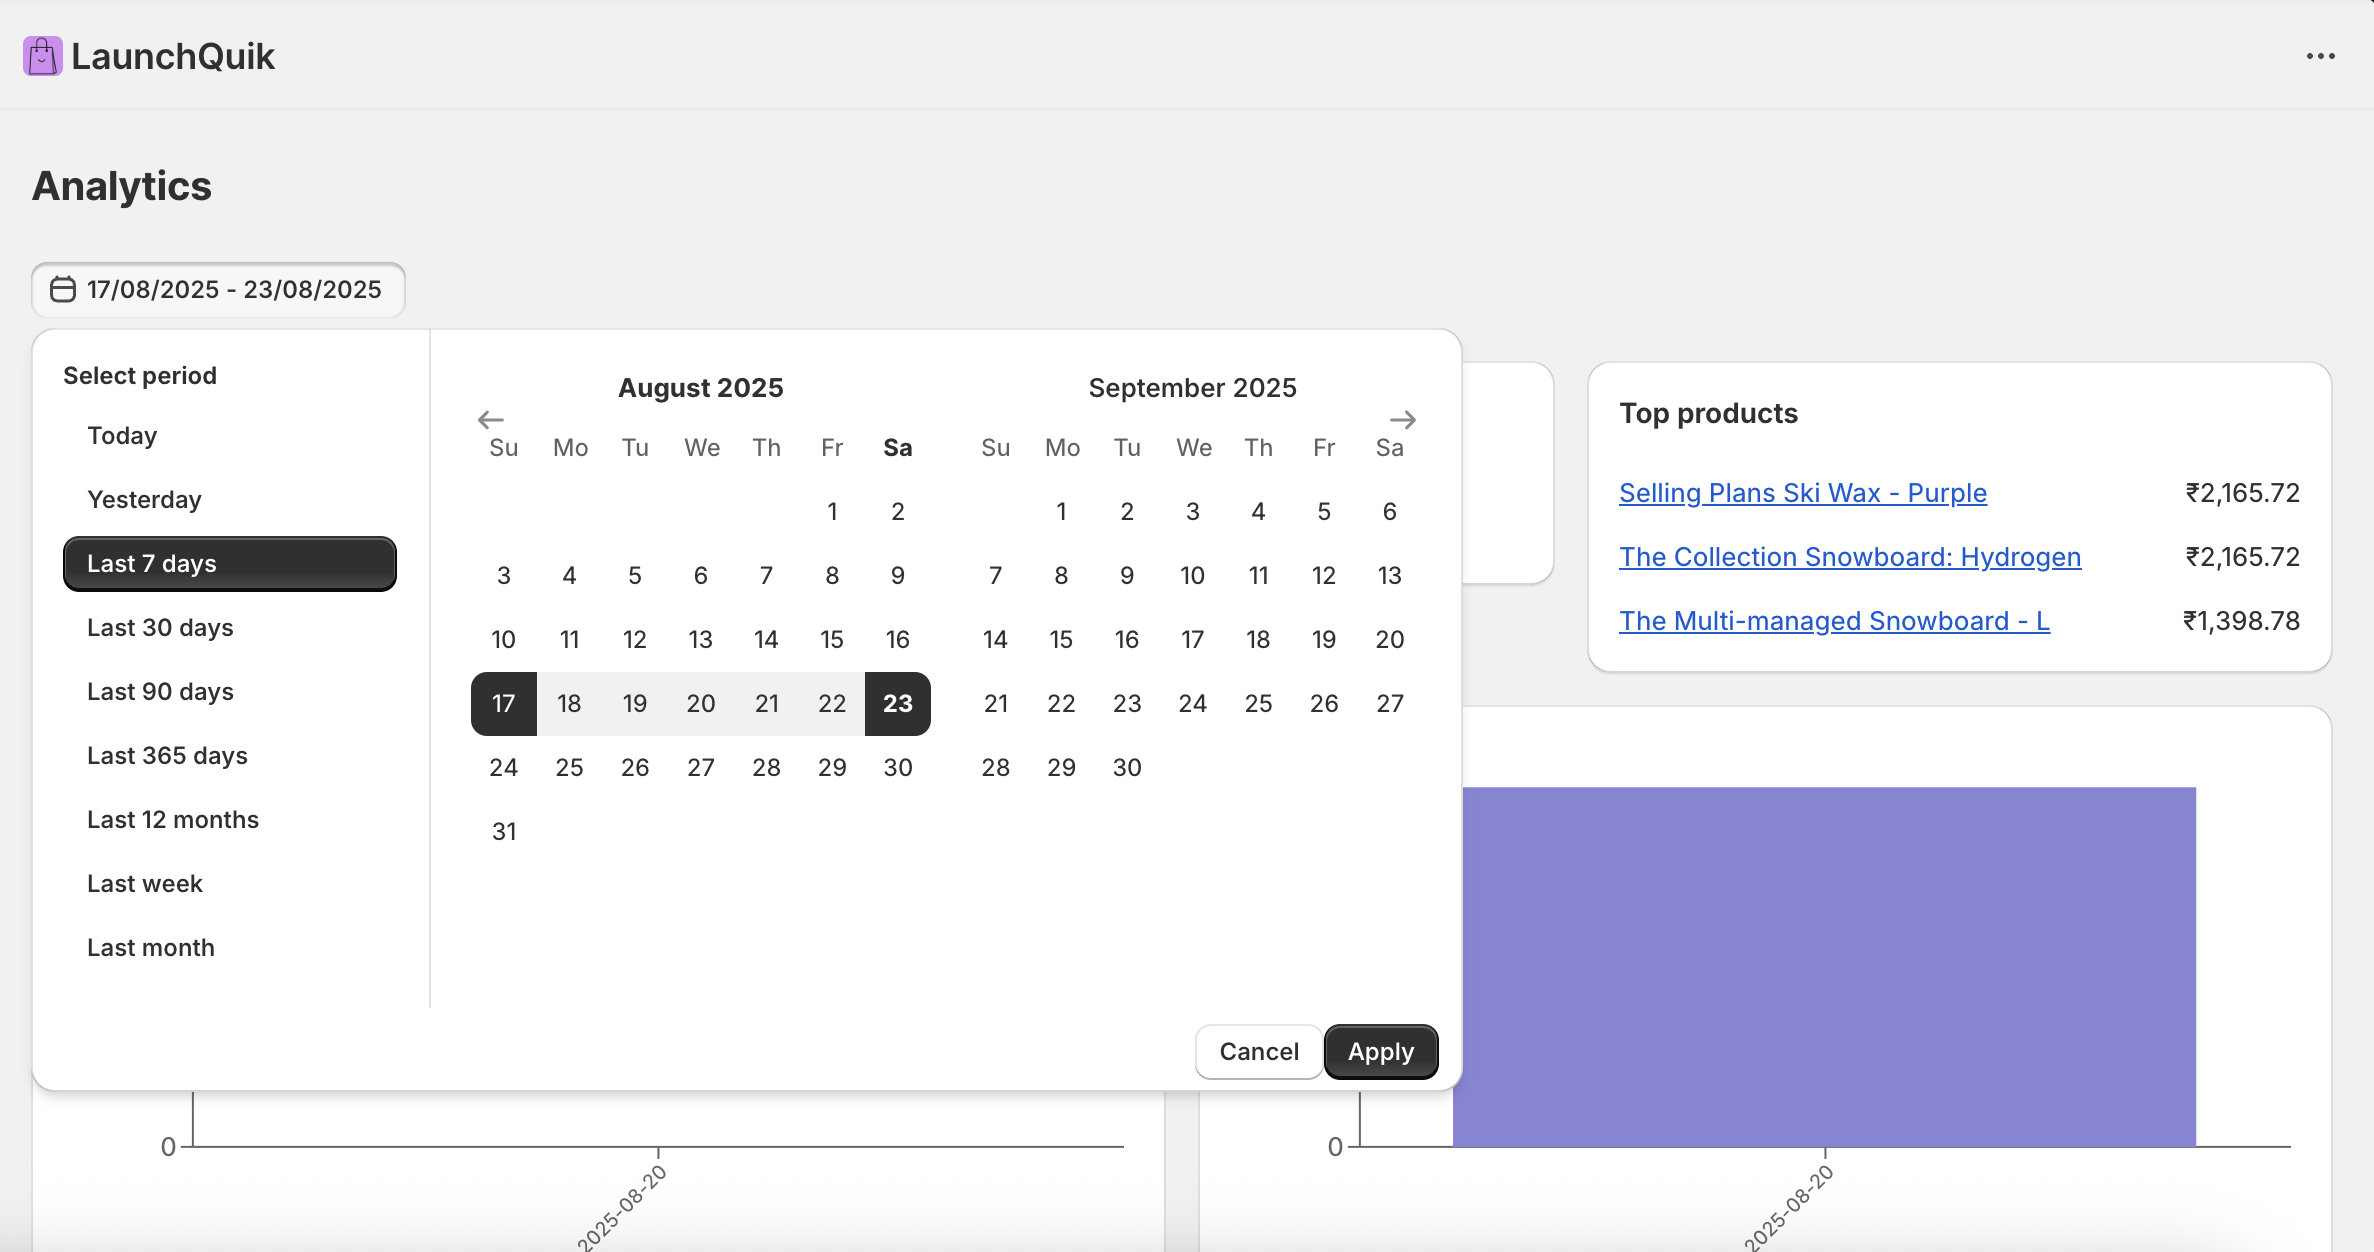
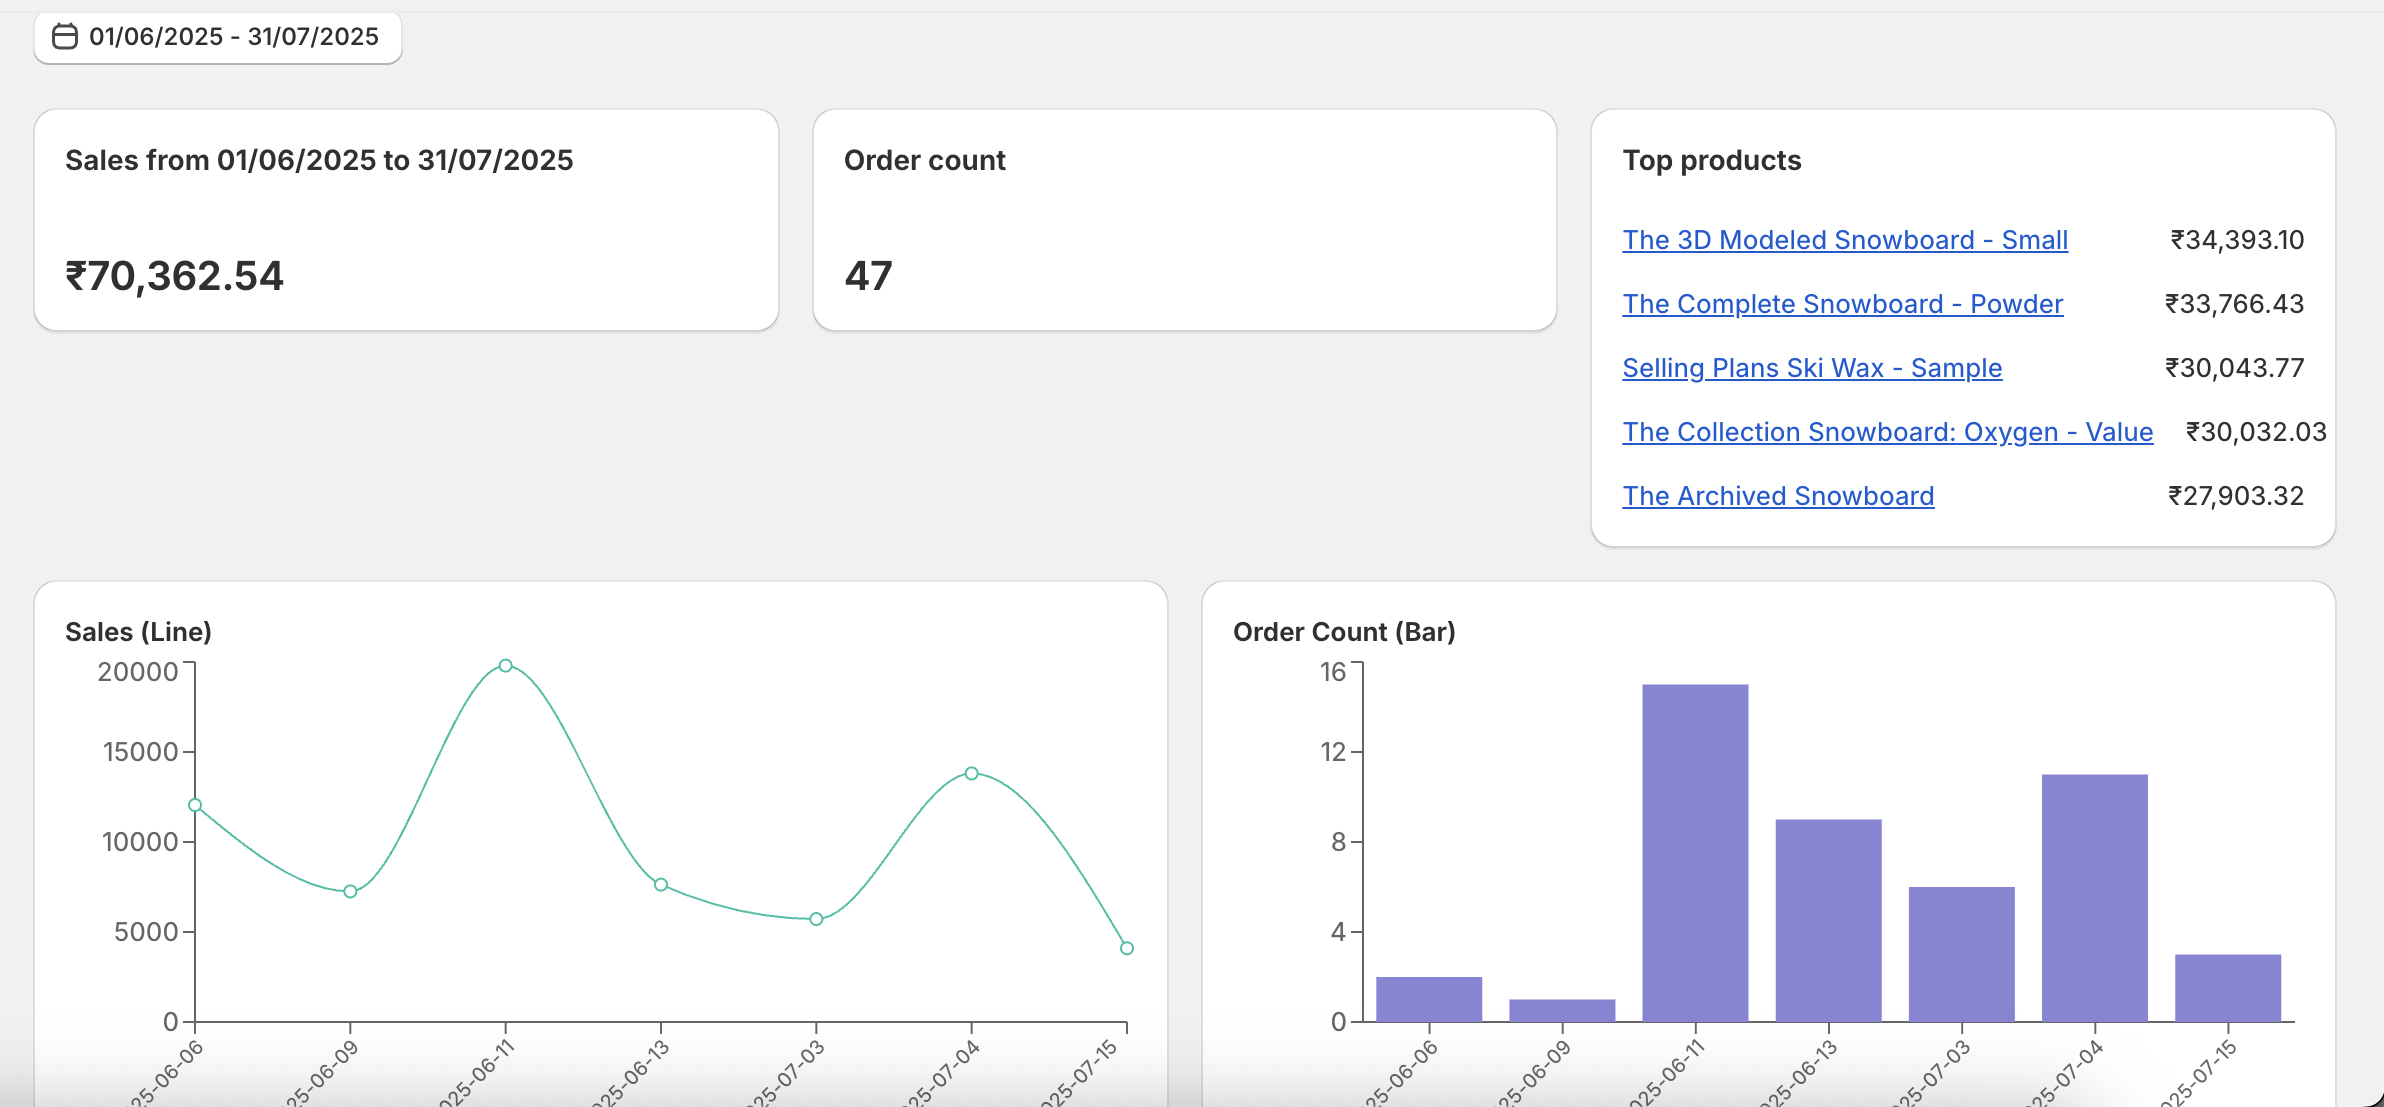
- Analytics dashboard: Built-in analytics dashboard to track orders revenue, total count based on date range.
- Built for Shopify: It is optimized for "Built for Shopify".
- Scalable architecture: Launch apps that can grow with your business.
Why Choose LaunchQuik?
- Save Time: Focus on building app that solves a merchant problem, not on repetitive tasks.
- Avoid headaches: No more cors error, setting up Billing API, analytics dashboard, webhook configuration, listing screenshots.
- Earn fast: The faster you launch, the more you learn, the more you earn.
- Stay Updated: I updated code regularly up with Shopify's latest features and best practices, so you don't have to invest time.
Getting Started
- Pre-requisites: Make sure your development environment meets the.
- Installation process: Simple guide to set up LaunchQuik.
Explore LaunchQuik
- Features: Discover the powerful features at your disposal.
- Deployment: Simple guide to deply your Shopify app on Fly.io, Render.com, or DigitalOcean.
Need Help?
Our documentation covers everything you need to know about LaunchQuik. If you can't find what you're looking for, check out our FAQ or email me at support@launchquik.dev.
Start launching amazing Shopify apps today with LaunchQuik!
Getting Started
Pre-requisites
To use LaunchQuik effectively, make sure your development environment meets the following requirements:
Node.js
- Why: Required to run Shopify Remix and LaunchQuik.
- Version: 18.x or later (LTS recommended)
Note: You can't use Polaris 13.9.5 with Node 18.x
node --version
npm or yarn
- Why: Required to install and manage dependencies.
- npm: 9.x or later
- pnpm: 8.x or later
- yarn: 1.22.x or later
npm -v
# or
yarn -v
# or
pnpm -v
Git
- Why: For cloning the repository and version control.
- Version: 2.x or later
git -v
Additional Software
- Code Editor: VS Code with the Shopify Remix extension recommended
- Browser: Latest Chrome, Safari, Edge or Firefox
Shopify Requirements
- Shopify Partner Account: Required to create & manage your Shopify apps
- Shopify CLI: v3.x
- Shopify Development Store: To test your Shopify app
Basic knowledge of:
Installation Process
Congratulations on taking first step towards launching your Shopify app with LaunchQuik! This guide will walk you through setting up your Shopify app with LaunchQuik.
- Accept GitHub Invitation
Check your email for an invitation from GitHub. Click the invitation link, sign in or create a GitHub account. Then click "Accept invitation" to gain access to the repository.
- Clone the Repository
Open your terminal and run below command:
git clone https://github.com/launchquik/toolkit.git
cd launchquik
If you have selected starter plan, then run below command:
git clone https://github.com/launchquik-starter/toolkit.git
cd launchquik-starter
- Install Dependencies
Make sure Node.js and npm/yarn are installed. Then run:
npm install
# or
yarn install
# or
pnpm install
- Set Up Environment Variables and Scopes
Copy the content of
.env.exampleto.envand fill in the required values:APP_NAME=LaunchQuik APP_HANDLE=launchQuik-app-handle DATABASE_URL=postgres://postgres:password@127.0.0.1:5432/launchquik-db SHOPIFY_APP_URL=https://apps-remix.com SHOPIFY_API_KEY=12345678 SHOPIFY_API_SECRET=12345678
Open
shopify.app.tomland add:scopes = "read_locales, read_customers, read_products, write_discounts, write_orders, write_products, write_metaobject_definitions, write_metaobjects,write_products"
- Generate prisma migration
Run the following command:
npm run prisma migrate dev
# or
yarn prisma migrate dev
# or
pnpm prisma migrate dev
- Run your app locally
Run the following command:
npm run dev
# or
yarn dev
# or
pnpm dev
- Verify app installation
Check your console for errors and if all pages are working.
Features
Billing & Subscriptions

- Monthly or yearly subscription
- Usage charge
- One-time charge
Note: As per Shopify Limitations, You can't use Shopify's managed pricing feature with manual pricing. Use managed pricing only if usage charge or one-time charge is not required. Also, Shopify doesn't allow usage charge to be used with yearly subscription.
Managed pricing
To use managed pricing, you need to set ENV variable MANAGED_PRICING to 1 in your .env file.
Once you have done that, you can start creating your pricing plans in the Shopify app listing page. From Shpoify admin apps page, click on the app that you want to configure pricing for, then click on the Distribution -> Manage listing -> Edit -> Go to Pricing details section -> click on the "Manage" button and configure your pricing plans.
Manual pricing
To use managed pricing, you need to set ENV variable MANAGED_PRICING to 0 in your .env file.
You can use /app/utils/constants.jsx for configuring different pricing variables. Also, you can use /app/routes/plans.jsx for placing your additional logic.
Once you have configured above, LaunchQuik will handles the rest, i.e. integrating these plans with the Shopify Billing API.
After the Merchant accepts the charge, it will be redirected to /approved & you can use /app/routes/approved.jsx for placing your additional logic.
Tips
- Keep a free plan to attract users and more installations
- Offer a free trial to increase Merchant's trust
- Properly communicate the value of each pricing tier
- Use Shopify's managed pricing if usage charge or one-time charge is not required
Webhooks
Webhooks allows your application to receive real-time notifications about specific events for exmaple when a new order is created, a customer is created, a product is created, etc. By subscribing to various webhook topics, your app can stay in sync with Shopify data or perform some tasks whenever any subscribed events occur. Webhooks are a more efficient alternative to continuously polling for changes.
Key Terms
- Webhook topic: The type of event to listen for, such as
orders/create. - Webhook subscription: The endpoint URL and topic your app listens to.
Setting Up Webhooks
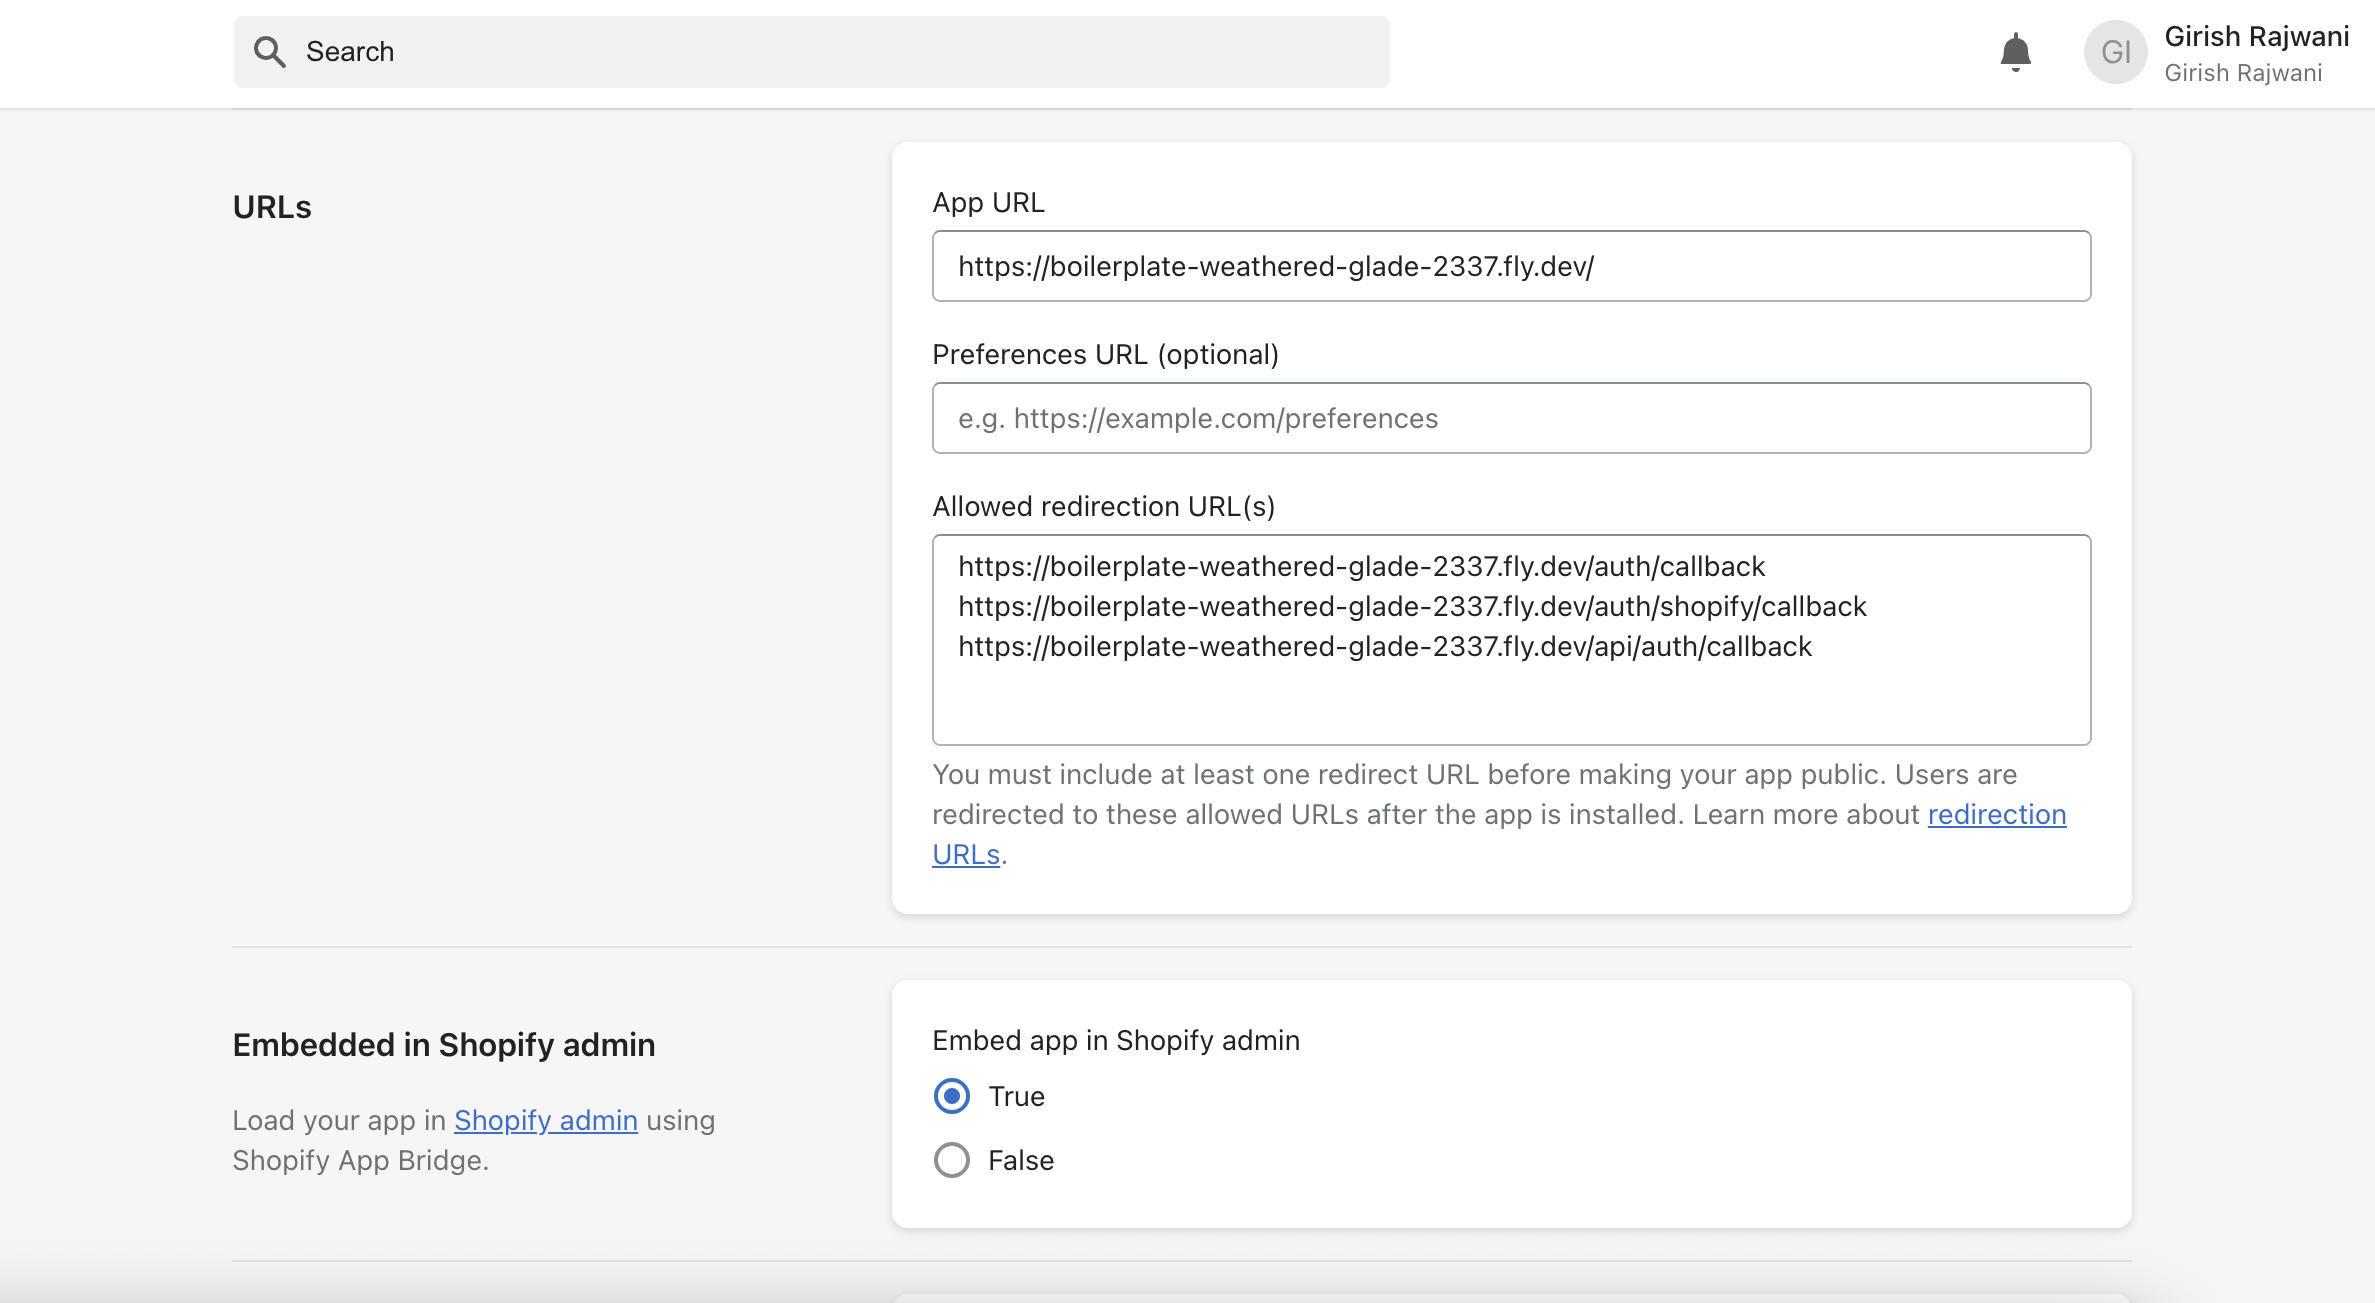
- Subscribe to a topic: You can either use GraphQL Admin API to register the webhook topic or you can simply mention the webhook topic in the .toml file.
- Specify an Endpoint: A secure HTTPS endpoint URL.
- Verify HMAC: To make sure the webhook is coming from Shopify, we need to verify the HMAC signature and that implementation is already done in LaunchQuik.
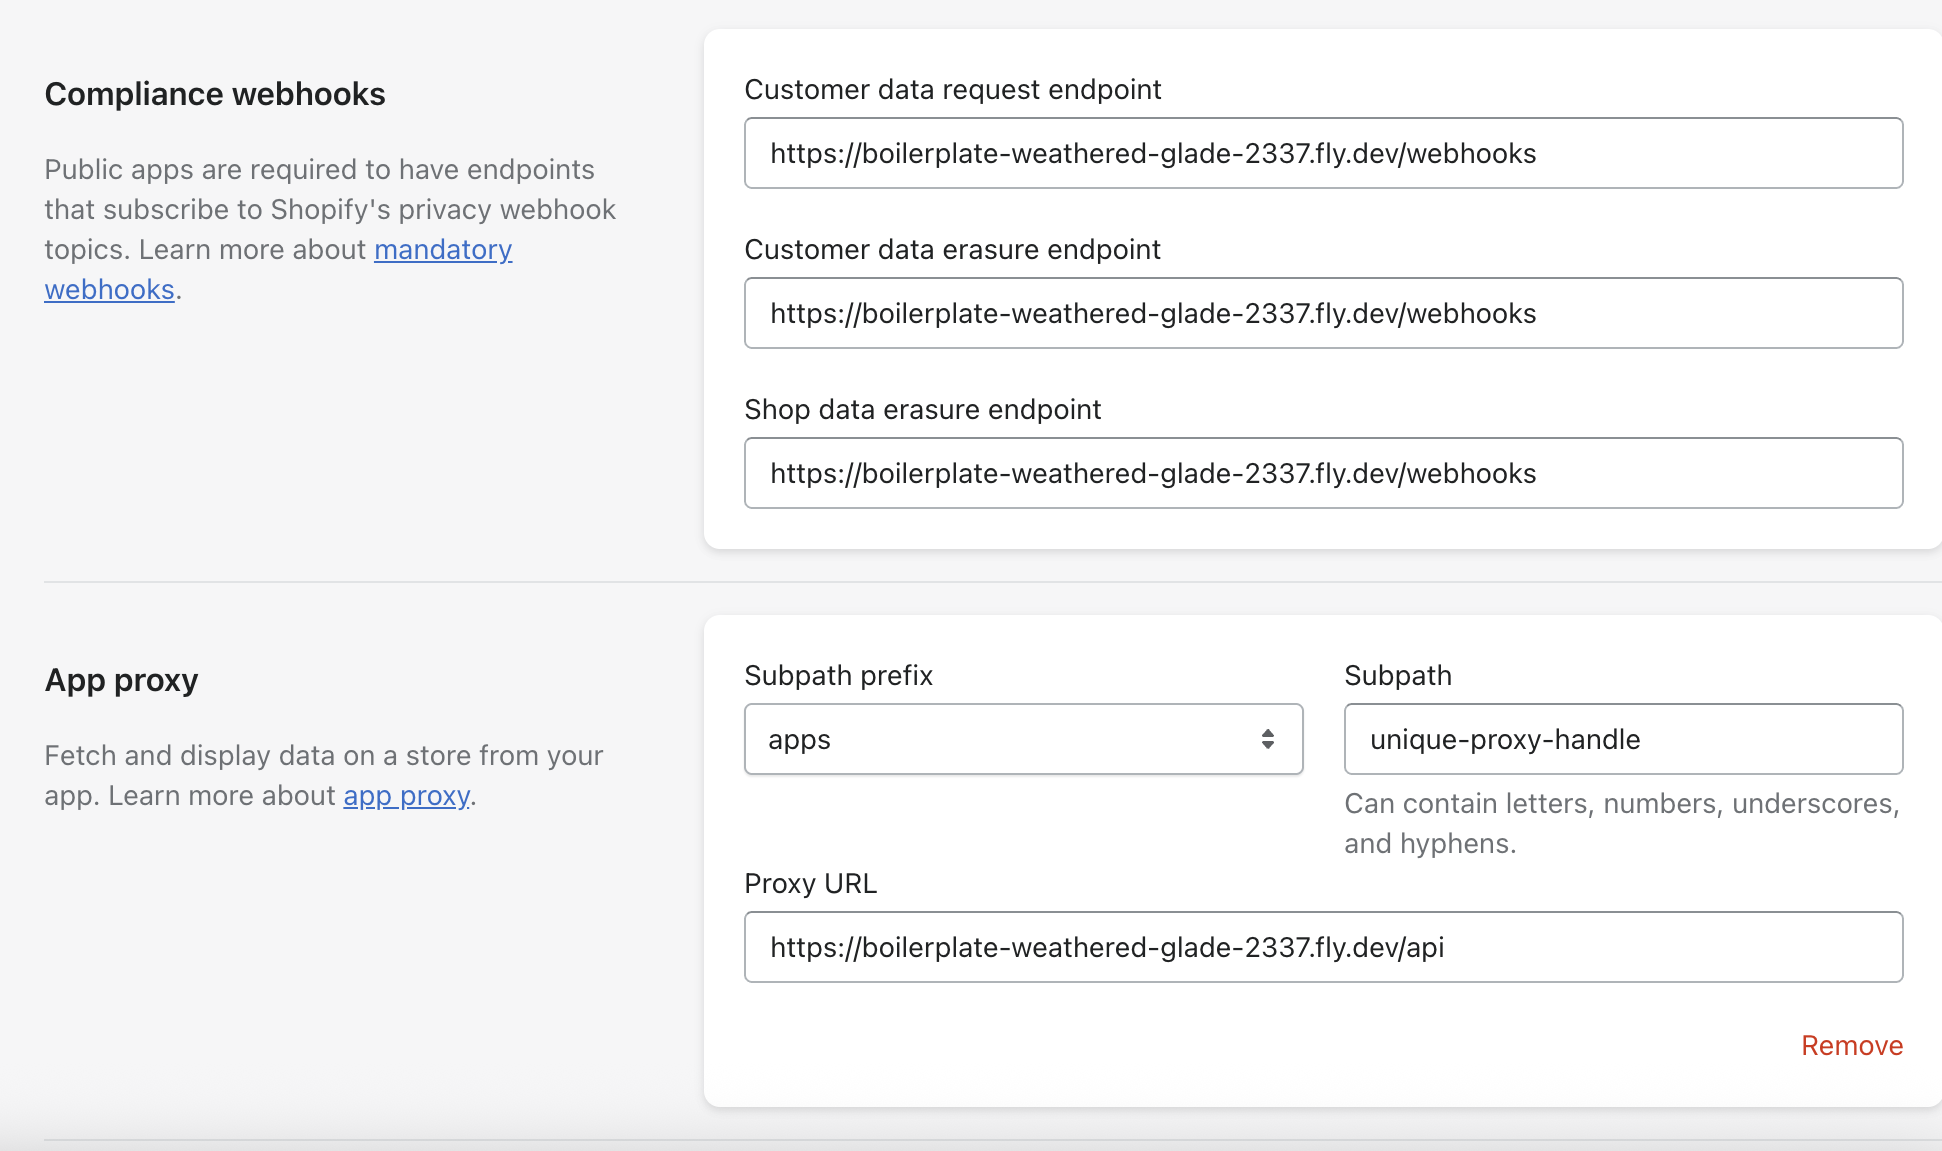
- GDPR: Shopify requires GDPR mandatory compliance webhooks for apps to manage customer data securely.
The /webhooks route does the HMAC verification to verify that request is from Shopify & returns a 200 status. You can use /app/routes/webhooks.jsx for placing your additional logic.
All configuration is done in .toml file
[webhooks]
api_version = "2025-07"
[[webhooks.subscriptions]]
topics = ["app/uninstalled", "orders/create"]
compliance_topics = ["customers/redact", "customers/data_request", "shop/redact"]
uri = "/webhooks"
If you wish to subscribe for any other webhook topic, then add in the topics array in .toml file.
Deploying webhook topics
Run the following command to update the webhooks configuration in the Shopify partner dashboard:
npm run deploy
# or
yarn deploy
# or
pnpm deploy
If you wish to add or remove a webhook topic, then remove it from the "topics" in the .toml file and run the above command to update the webhooks configuration in the Shopify partner dashboard.
Database
For database, LaunchQuik uses Prisma as ORM, with MySQL configured as default. You can easily swap it with PostgreSQL or other providers if needed. Database models are defined in prisma/schema.prisma.
Configuration
Set your MySQL connection string in the ENV variableDB_URLDB_URL=mysql://user:password@host:port/database_name
If you wish to use another database, then change the provider in schema.prisma:
datasource db {
  provider = "postgresql"
  url      = env("DATABASE_URL")
}
To get you started, LaunchQuik have already created 2 tables for you: Session and Stores. Session is for storing the session data of the user and Stores is for storing the data related to the store like storen name, subscription charge id, etc.
Along with this, LaunchQuik have built-in CRUD models for performing CRUD operations on the tables. You can create additional models inside /app/models.
Creating new tables
To create a new table, define a new model in schema.prisma:
model Tablename {
  id     Int    @id @default(autoincrement())
  title  String
}
Generate prisma migration:
npm run prisma migrate dev --name tablename
# or
yarn prisma migrate dev --name tablename
# or
pnpm prisma migrate dev --name tablename
To view data, open prisma studio:
npm run prisma studio
# or
yarn prisma studio
# or
pnpm prisma studio
Emails
LaunchQuik supports Resend, Mailgun, or Brevo for sending emails. You can choose any as per your choice.
LaunchQuik sends email on install and uninstall of your app. You can use app/routes/app.jsx for accessing the app install email logic and app/routes/webhooks.jsx for app uninstall email logic. To modify email templates, you can use app/utils/email_templates.js
There is a admin page where you can send app updates or marketing emails to all Shopify Merchants. You can use /app/routes/app.admin.jsx for placing your additional logic.
Note: To use admin page. you need to set ENV variable ADMIN_STORE in the .env file so that only admin stores can access the admin page.
Analytics Dashboard
LaunchQuik has a built-in analytics dashboard to track orders revenue and orders count based on the date range. It also has built-in bar and line charts. You can use /app/routes/app.analytics.jsx for placing your additional logic.
Pagination tables
LaunchQuik has a built-in pagination tables for orders and products along with search, sort and filter options. You can use /app/routes/app.orders.jsx and /app/routes/app.products.jsx for placing your additional logic.
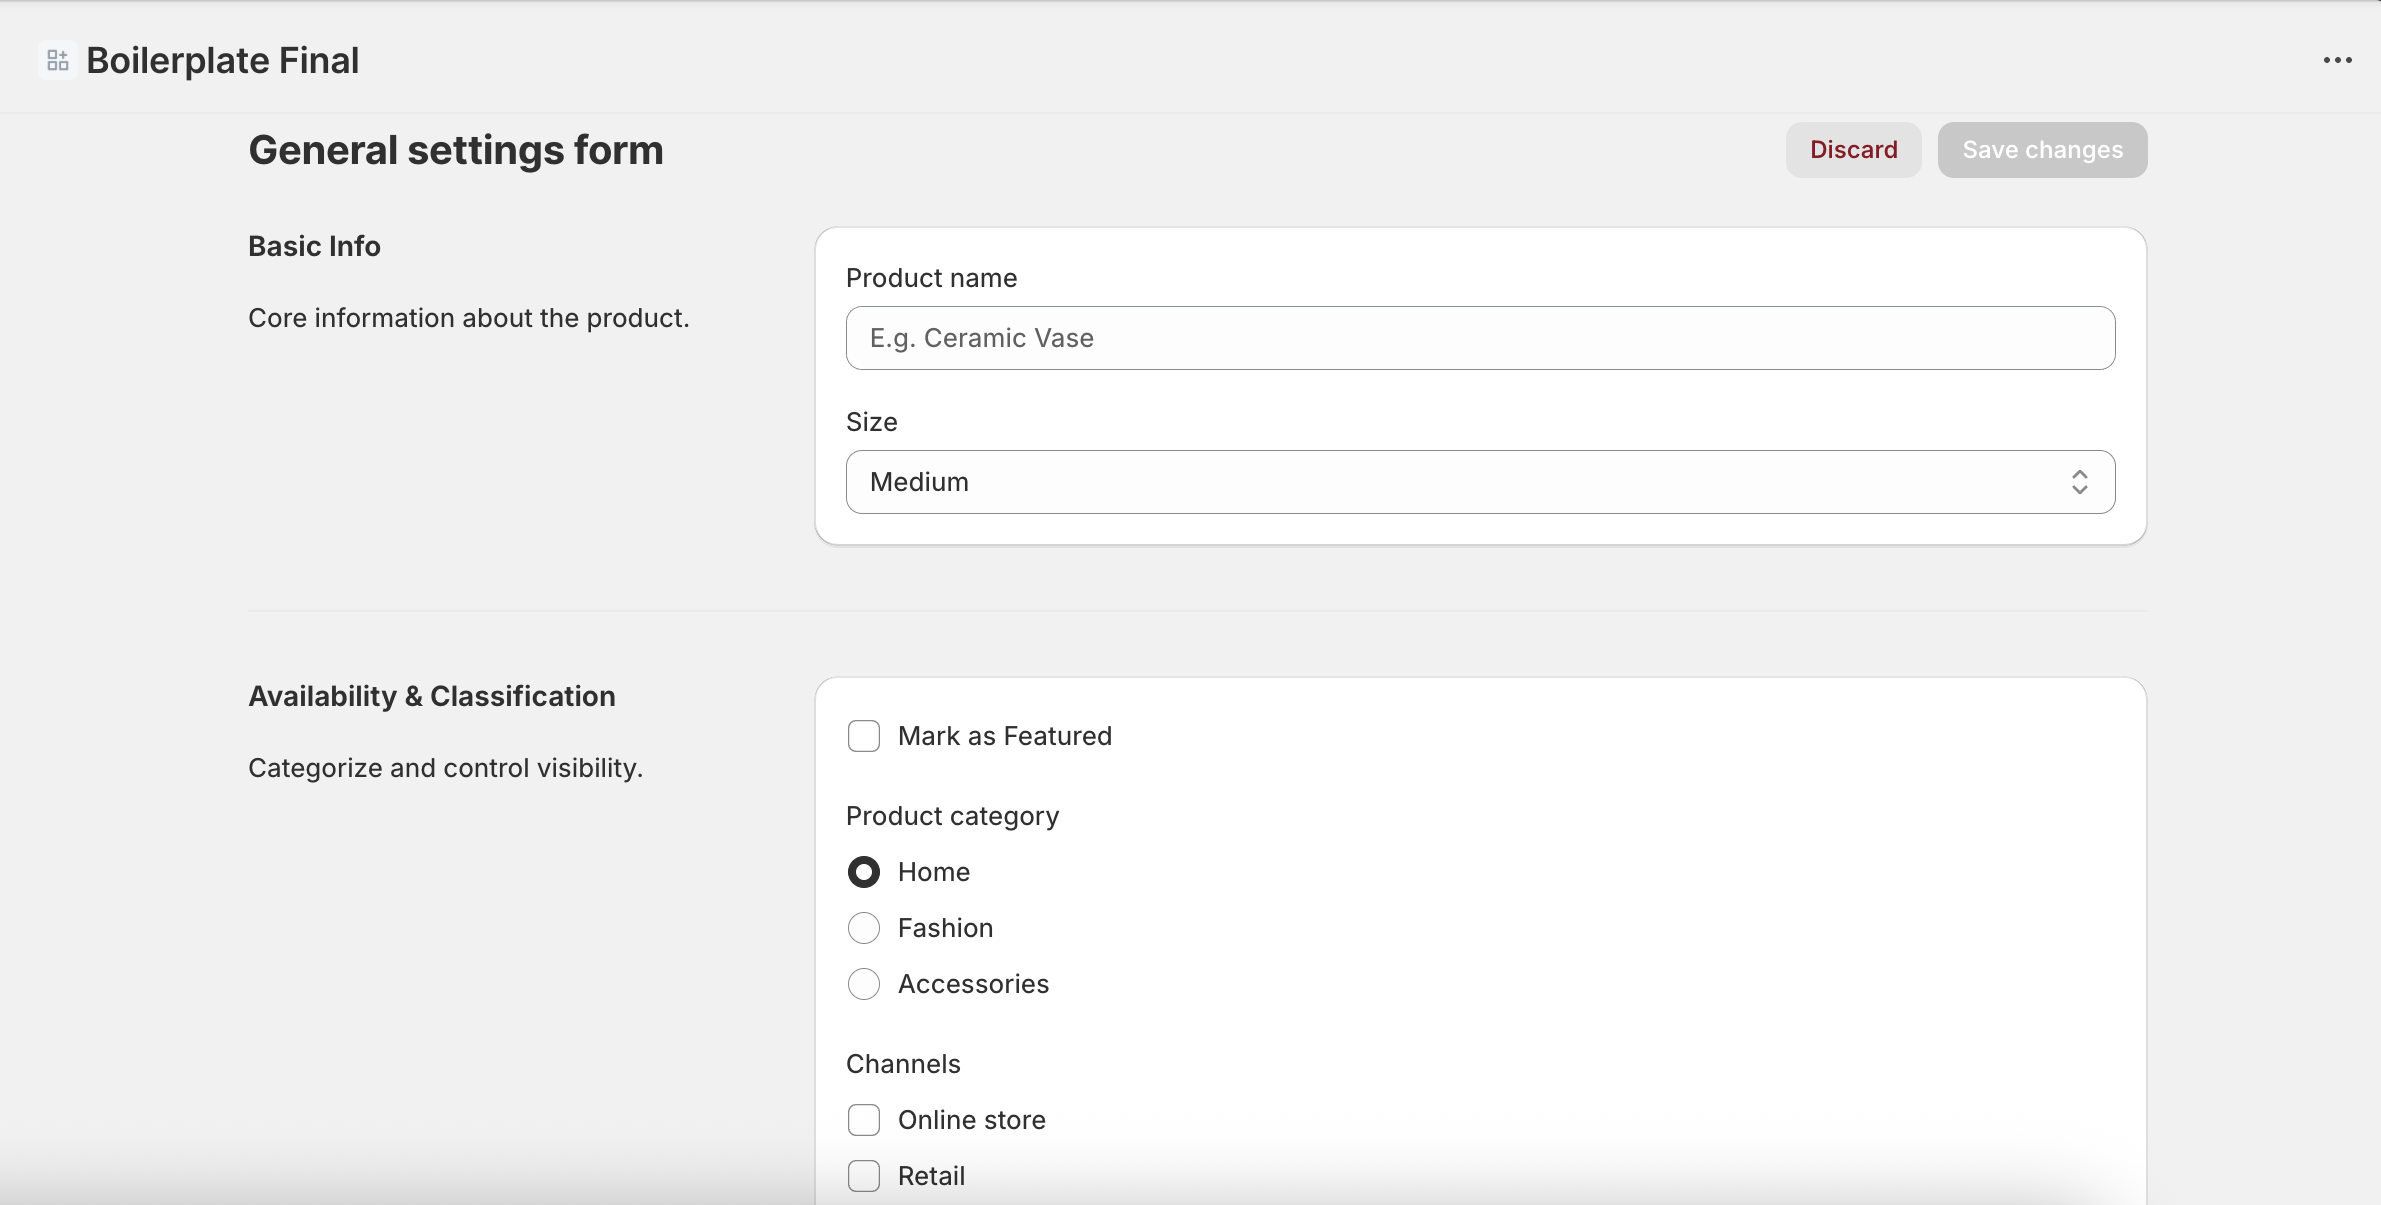
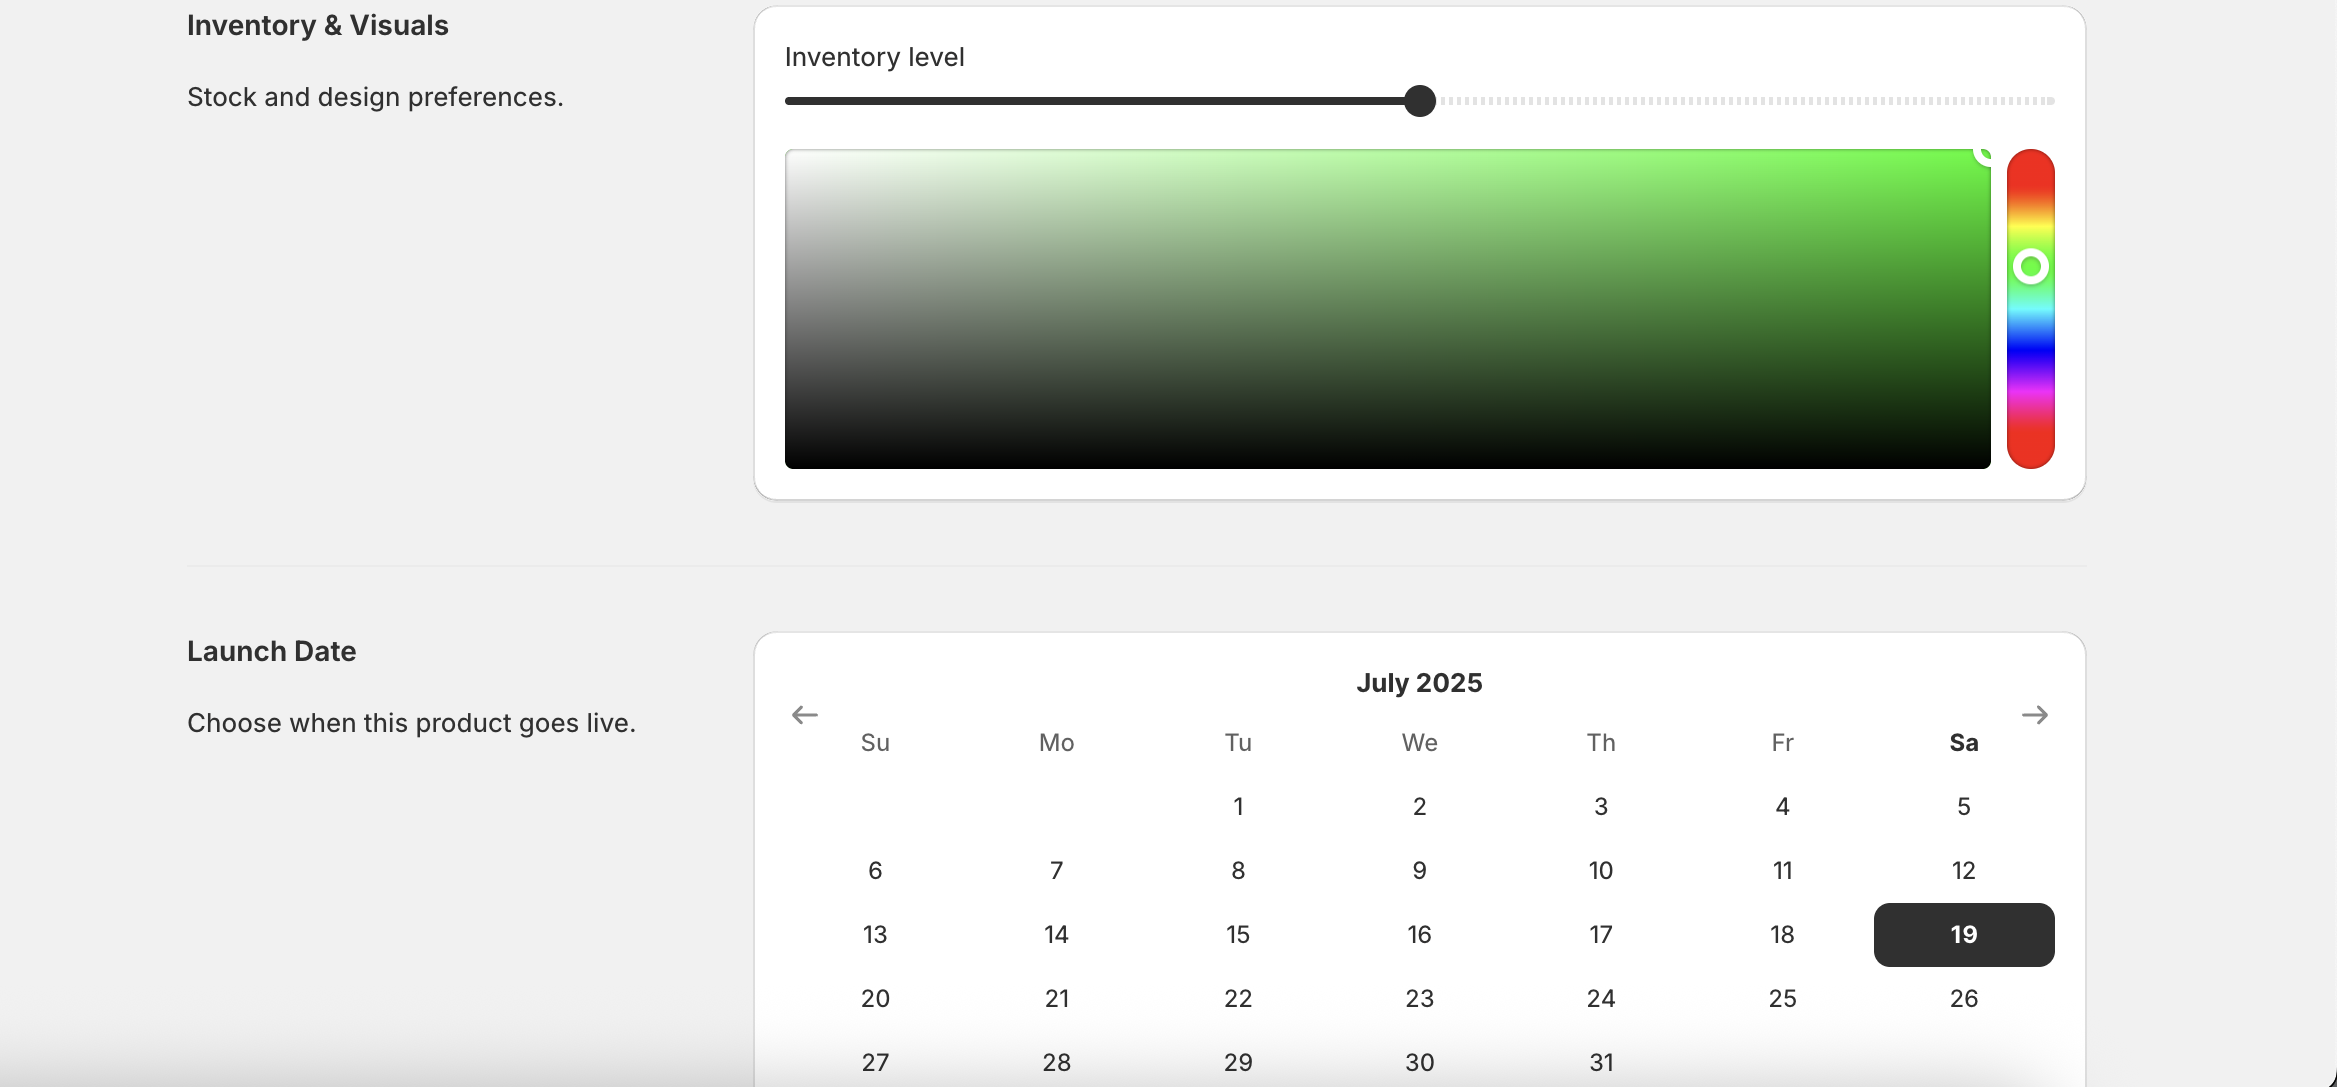
Form
LaunchQuik has a built-in form with various form fields for saving app settings. You can use /app/routes/app.settings.jsx for placing your additional logic.
Extensions
LaunchQuik includes the following pre-built extensions to accelerate Shopify app development. All the extensions have a check for an active plan and include a fetch call to help avoid the headache of a CORS error.
- Theme app extension
- Checkout UI extension
- Post purchase UI extension
- Thank you and order status page extension
Theme app extension
LaunchQuik provides ready-to-use theme app extensions with fetch call along with extension settings that gives merchants flexibility to edit the theme app extension.
You can use extensions/theme-app-extensions/blocks/block.liquid to access theme app extension code and add your additional logic. It contains fetch call with app proxy URL. To configure app proxy in Shopify partners dashboard, refer this.
Checkout UI extension
LaunchQuik provides ready-to-use checkout UI extension with fetch call along with input settings that gives merchants flexibility to edit the theme app extension. You can use extensions/checkout-upsell/src/Checkout.jsx to access checkout UI extension code and add your additional logic.
Note: Checkout UI extensions is only supported in Shopify Plus.
Post purchase UI extension
LaunchQuik provides ready-to-use post-purchase UI extension with fetch call. You can add your additional logic in my-post-purchase-ui-extension/src/index.jsx and backend logic in routes/api.get-offer.jsx and routes/api.sign-changeset.jsx.
Thank you and order status page extension
LaunchQuik also provides ready-to-use NPS survey extension for the thank you and order status page along with fetch call to update NPS survey order metafield. You can add your additional logic in post-purchase-nps-survey/src/Checkout.jsx.
After making changes in the extension code, make sure to run below command to deploy extension changes.
npm run deploy
# or
yarn deploy
# or
pnpm deploy
Best practices
- Use input / extension settings as it will help you to reduce your embedded app code. For example, instad of using radio button for auto slide in your embedded app form, you can use radio button in input / extension settings.
- Use plan status and plan type metafield to check whethere plan is active or inactive and type of plan and based on that allow the usage of extension.
- Focus on responsive deisgn.
- Check compatibility with different stores and themes.
- Use lables/placeholders wherever possible.
Metafields
Order
- NPS Score
Shop
- Plan status
- Plan type
Product
- Rating
import { setMetafieldValueMutation } from "utils/graphql-queries";
await admin.graphql(setMetafieldValueMutation(ownerId, namespace, key, value))
Redis & Queue
LaunchQuik have implemented Redis for caching and BullMQ queue to handle operations efficiently. This is helpful for processing data asynchronously and also for improving app performance.
Redis
Redis is used for caching any frequently accessed data to improve app performance and reduce response time. You can use utils/redis-server.js, and app/routes/app.settings.jsx for placing your additional logic.
Queue
When webhook event is triggered (for eg. orders/create), then instead of processing them immediately, the order data is added to a queue for background processing. This will prevent webhook timeouts. You can use utils/queue-server.js, and app/routes/webhooks.jsx for placing your additional logic.
Configuration
Set REDIS_URL in .env file:
REDIS_URL=redis://localhost:6379
# or for production
REDIS_URL=redis://username:password@host:port
Live chat
/app/root.jsx for adding your unique ID of crisp or tawk.to.Multi Language - I18n
/app/i18n. To load any locale file, you need to import in /app/root.jsx file as shown below:import es from "./i18n/es.json"; import fr from "./i18n/fr.json";Below is the sample content of locale file:
export default {
  welcome: {
    heading: "Hey {name}",
    description: "This is a localized Shopify app",
  },
};
To use translations in any file, refer below code:const [i18n] = useI18n({ id: "default" });
i18n.translate("welcome.heading", {name: "Shopify Merchant"}Deployment
Fly.io
Fly.io provides a platform and CLI tool dedicated to deploying Shopify remix apps with a free tier suitable for small apps.
- Built-in support for Shopify remix app
- Free SSL domain
- Command-line workflow
Deployment Steps:
- Install
flyctlCLI on your system. - Run
fly auth signupto signup orfly auth loginto login to your fly.io account. - In your project directory, run
fly launchto launch your app. fly launch parses the output ofshopify app env show. The remainder will be placed into your fly.toml and your app will be deployed to fly.io. - In case if your database is not hosted on fly.io, then instead of
fly launch, runfly launch --no-deploy --no-db. Set the database connection string and other ENV variables usingfly secrets set $(grep -v '^#' .env | xargs). - Deploy your app using
fly deploycommand. Also, whenever you make changes to your code, runfly deployto deploy your app. - After deployment, use fly.io URL to configure your Shopify app.
Vercel
Vercel provides a developer-friendly platform for deploying remix apps with a free tier suitable for small apps.
Deployment Steps:
- Commit your code and push it to a repository on GitHub.
- In the Vercel Dashboard, click Create project.
- Add GitHub account, select the repository that has the code.
- Set project name, select framework as "Remix", set root directory as "./", set build command as "npm generate prisma && npm run build", copy all the environment variables from the .env file.
- Click on "Deploy" button to deploy your app.
- After deployment, use web service Vercel URL to configure your Shopify app.
Render
Render provides a developer-friendly platform with a free tier suitable for small apps.
- Free plan for small apps
- Free SSL domain
- Automatic deployment from Git branch on push
Deployment Steps:
- Commit your code and push it to a repository on GitHub and connect this repo to your Render service.
- In the Render Dashboard, click New -> Web Service.
- In the service creation flow, select the Git branch that has the code and give the service a name such as shopify-remix-app
- Set the service's Language field to Docker and choose an instance type (such as Free or any other).
- To set environment variables, click on "Add from .env" button, copy & paste your .env file and it will automatically generate the environment variables.
- Click on "Create Web Service" button to deploy your app.
- After deployment, use web service Render URL to configure your Shopify app.
DigitalOcean
Personally, I use DigitalOcean droplets for all my Shopify apps as it is cost effective and easy to use. I have made a detailed guide on how to deploy Shopify remix app on DigitalOcean. Read here
Post deployment steps
- Configure your Shopify app with the new URL generated after deployment.
- Test your app properly on any development store.
Support
You can contact me by:
What to Include
- Email ID used during purchase
- Proper description of the issue
- Steps to reproduce the issue
- Any error message or screenshot
- Shopify store URL (if issue is on frontend)
Feature Requests
I would love to hear your ideas! Submit your feature requesthere or or email me at support@launchquik.dev.
Support Hours
I am available everyday. Looking at the IST timezone, weekends, and major holidays, please expect some delay in the response.
What's next?
Improvement is the part of journey. I update codebase regularly to stay up-to-date with Shopify's latest features and best practices.
🎉 Congrats on making it that far, developer!
- Girish Rajwani